> For the complete documentation index, see [llms.txt](https://growi-finance.gitbook.io/hf-docs/llms.txt). Markdown versions of documentation pages are available by appending `.md` to page URLs; this page is available as [Markdown](https://growi-finance.gitbook.io/hf-docs/how-to-invest-in-growi.hf/3o-transfer-usdc-and-eth-from-binance-to-your-metamask-wallet.md).

# 3º Transfer USDC and ETH from Binance to your MetaMask wallet

Once you have purchased USDC on Binance you have to send it to your MetaMask wallet in order to invest in Growi.HF.

## Step 1: Start the withdrawal process on Binance

1. Click on the “Deposit” button at the top of the Binance page. Then, click on “Deposit Crypto”

<figure><img src="https://947384828-files.gitbook.io/~/files/v0/b/gitbook-x-prod.appspot.com/o/spaces%2F1Mb816zrME66p9NSyrZs%2Fuploads%2FJFzelWH7Epwaj7BJTkMf%2Fimage.png?alt=media&amp;token=f0b542e8-5da8-4896-9746-26aa4a93af38" alt=""><figcaption></figcaption></figure>

<figure><img src="https://947384828-files.gitbook.io/~/files/v0/b/gitbook-x-prod.appspot.com/o/spaces%2F1Mb816zrME66p9NSyrZs%2Fuploads%2FL9dxGNrYHXThpUaFLhKa%2Fimage.png?alt=media&amp;token=f93f479b-ae58-4892-ba70-d267362aecb5" alt=""><figcaption></figcaption></figure>

2. Now switch to the “Withdraw Crypto” tab — yes, Binance doesn’t take you there directly.

<figure><img src="https://947384828-files.gitbook.io/~/files/v0/b/gitbook-x-prod.appspot.com/o/spaces%2F1Mb816zrME66p9NSyrZs%2Fuploads%2FTbY4q9herzu949GhD0ON%2Fimage.png?alt=media&amp;token=e0c02a6e-ea1f-4ca7-b135-6c6f406318cc" alt=""><figcaption></figcaption></figure>

***

## Step 2: Set up the USDC transfer

1. In the coin selection field, choose USDC.

<figure><img src="https://947384828-files.gitbook.io/~/files/v0/b/gitbook-x-prod.appspot.com/o/spaces%2F1Mb816zrME66p9NSyrZs%2Fuploads%2Fh4q3dlH6kYfSpRpveI2e%2Fimage.png?alt=media&amp;token=1a67983f-d005-403a-97ff-83512c021a81" alt=""><figcaption></figcaption></figure>

2. Open your MetaMask wallet by clicking its icon in your browser.

<figure><img src="https://947384828-files.gitbook.io/~/files/v0/b/gitbook-x-prod.appspot.com/o/spaces%2F1Mb816zrME66p9NSyrZs%2Fuploads%2F5an9WClQxzVD6ScKrTck%2Fimage.png?alt=media&amp;token=1e5e96c2-a2d4-44f7-913a-1abd371c49a3" alt=""><figcaption></figcaption></figure>

3. Copy your wallet address by clicking the copy icon under your account name.

<figure><img src="https://947384828-files.gitbook.io/~/files/v0/b/gitbook-x-prod.appspot.com/o/spaces%2F1Mb816zrME66p9NSyrZs%2Fuploads%2FbZlIBjiktSFWdqvQMUao%2Fimage.png?alt=media&amp;token=9b73c446-e705-4bc6-8b47-4030be0def90" alt=""><figcaption></figcaption></figure>

4. Go back to Binance and paste that address into the “Enter address” box.

<figure><img src="https://947384828-files.gitbook.io/~/files/v0/b/gitbook-x-prod.appspot.com/o/spaces%2F1Mb816zrME66p9NSyrZs%2Fuploads%2F2R1eKRk6Aa2r9Xizen7D%2Fimage.png?alt=media&amp;token=1f6a5b9d-efce-4406-9c2c-b728a094737b" alt=""><figcaption></figcaption></figure>

5. In the Network dropdown, select “Arbitrum One”.

<figure><img src="https://947384828-files.gitbook.io/~/files/v0/b/gitbook-x-prod.appspot.com/o/spaces%2F1Mb816zrME66p9NSyrZs%2Fuploads%2FQKKAqIsh1cNb5VEK7N9z%2Fimage.png?alt=media&amp;token=2cc80774-91b8-4bba-a0be-19df50ae5c51" alt=""><figcaption></figcaption></figure>

***

## Step 3: Finalize the transfer

1. Enter the amount of USDC you want to transfer to MetaMask. This should be the exact amount you want to invest in Growi HF.

<figure><img src="https://947384828-files.gitbook.io/~/files/v0/b/gitbook-x-prod.appspot.com/o/spaces%2F1Mb816zrME66p9NSyrZs%2Fuploads%2Fjz3dR8iQEvls4vBFtHj2%2Fimage.png?alt=media&amp;token=64eabe6b-a440-4229-935f-e2aeb347c07c" alt=""><figcaption></figcaption></figure>

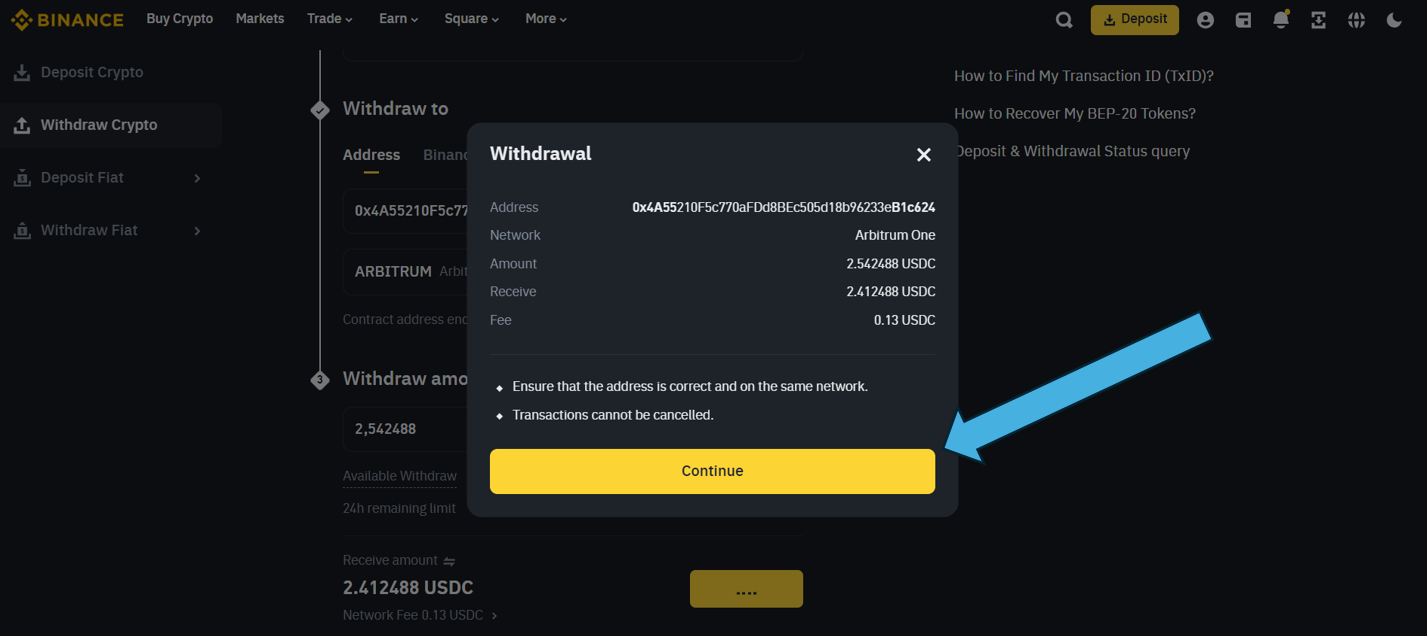
2. Click “Withdraw”, then click “Continue” to proceed.

<figure><img src="https://947384828-files.gitbook.io/~/files/v0/b/gitbook-x-prod.appspot.com/o/spaces%2F1Mb816zrME66p9NSyrZs%2Fuploads%2FJ92yH0VxO30Be6bcQSxP%2Fimage.png?alt=media&amp;token=e3f45799-0fee-446a-8bce-b4dd5b9c7be7" alt=""><figcaption></figcaption></figure>

<figure><img src="https://947384828-files.gitbook.io/~/files/v0/b/gitbook-x-prod.appspot.com/o/spaces%2F1Mb816zrME66p9NSyrZs%2Fuploads%2FJqq9vvpuKDtveGYnXqK6%2Fimage.png?alt=media&amp;token=8e00583c-9fba-4357-be0a-267b1b6d101f" alt=""><figcaption></figcaption></figure>

***

## Step 4: Complete verification and confirm

1. Binance will ask you to pass their security verification steps — usually using your authenticator app and email.
2. After completing verification, your transaction will be processed. It usually takes just a few minutes.
3. Once the transfer is complete, open your MetaMask wallet. Make sure the network is set to Arbitrum One, and you should see your USDC balance there.

***

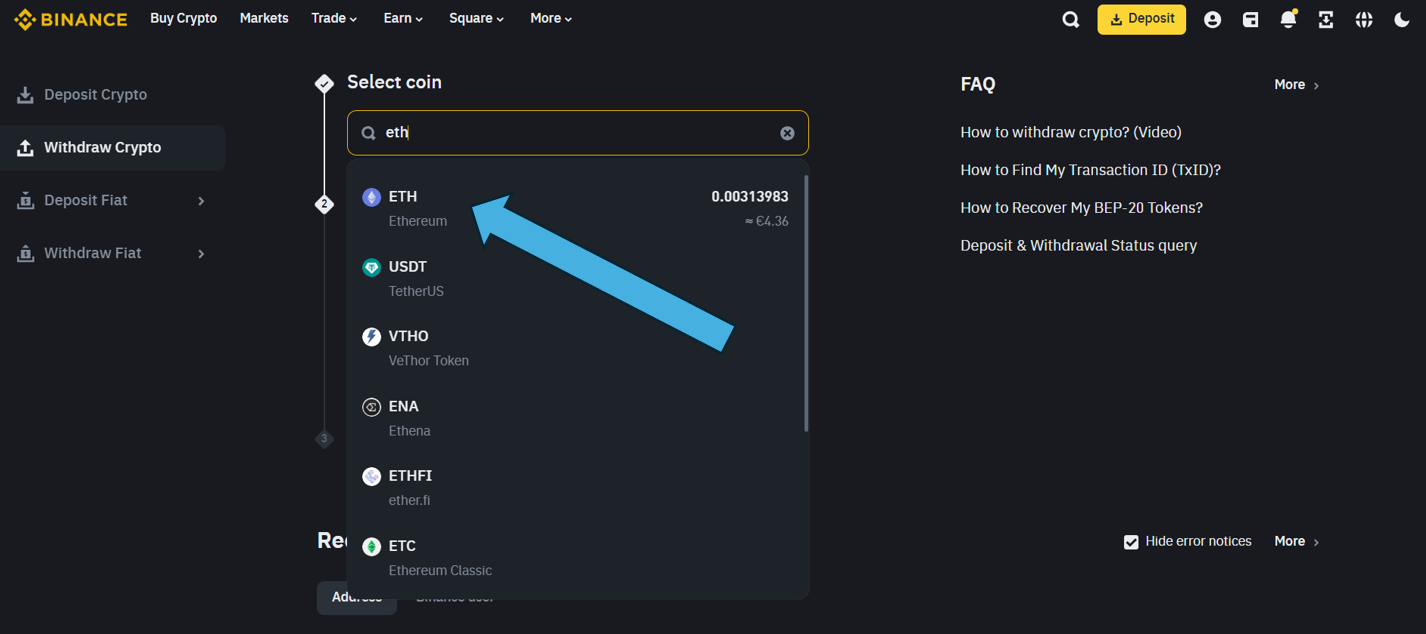
## Step 5: Repeat the process with ETH

<figure><img src="https://947384828-files.gitbook.io/~/files/v0/b/gitbook-x-prod.appspot.com/o/spaces%2F1Mb816zrME66p9NSyrZs%2Fuploads%2FNV90eR34PWdptY4tt0zh%2Fimage.png?alt=media&amp;token=e1aeef2d-f1e8-40d1-8928-d112f08cdde0" alt=""><figcaption></figcaption></figure>